I’ve noticed more often than not, when people import their images into Lightroom, that they try and decide what to keep and what to toss all at once. In other words, they will import their files and then starting from image #1 they move down the line “keep it”,,,, “toss it”…. and at the same time they may also attempt to rank it, decide their favorites and decide what to show on their website or portfolio – All this in a single viewing. I’d like to present my method for sorting my imports and explain why the process needs structure and objectivity.
In the end you’ll find it’s easier, faster and gives better results.
Looking below you may think this looks like a whole lot of work. You may be thinking “how can doing three steps be faster than just making a decision on the spot”… but it is. Try it out and you’ll soon find yourself tossing the old method of image sorting.
Step 1: Is there potential here? – The idea in step one is to quickly overview all the images you have just imported and decide in a glance if each photo has any potential at all or if it’s clearly crap to be tossed.
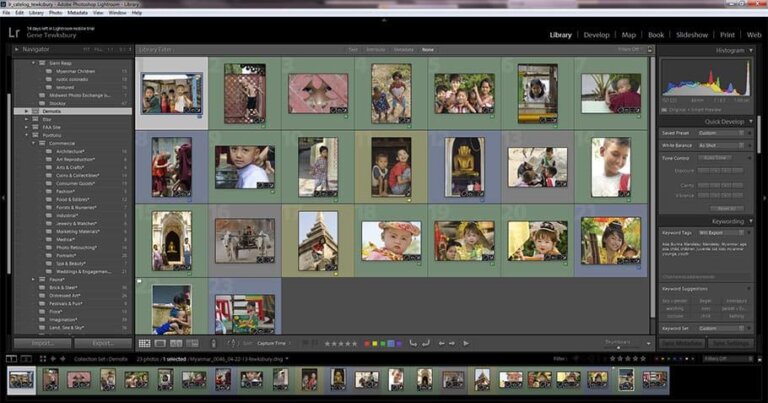
- First press the “tab” key on your keyboard to remove both sidebars. This gives you more space on your screen and allow you to display your thumbnails larger.
- I generally resize the thumbs so that about six are showing at a time (this will vary depending on your screen size), but the idea is I do not need to see a whole lot of detail here (you are not looking for perfect focus in this step), and I would like to be able to view the surrounding thumbs at the same time. The reason being, if I have several shots of the same subject I will want to only pick the clearly best compositions. If I’m looking at the images too large then I won’t see those “identical” shots at the same time. It is hard to judge which image of a group is best if you are not seeing them at the same time.
- Using my keyboard I begin the process. I simply use the arrow keys to move through each image, and then using the “P” key I apply a “pick” flag to any image that “speaks” to me at all.
- I’m only looking for composition here and/or very obvious flaws (like it’s so blurry you can see the focus issues even in the thumbnail).
- In other words you are just looking to see if a photo has “potential”
- Images that are nearly identical in composition should all be marked “pick”. You will narrow these down to the single best shot in step 2.
- Once you’ve flagged all your potential images, go to Library>Refine Photos (ctrl alt r). This feature applies a “reject” flag to all images that you did not mark “pick” and automatically unflags all the “picks”.
Step 2: I want to keep this. – Here I am looking for images which I want to actually keep. It is here I’m looking to make sure that each image is of suitable quality (consider this the technical step as it’s more about the pixels and less about the composition).
- IMPORTANT: First I need to eliminate all images that did not make the first cut. By using your flag filter (at the bottom of the work area) you can remove all “rejected” images from view.
- So why not just delete them? Because you want to go through your whole sorting process before deleting images. You never know when you might wish to go back and revisit a rejected image.
- I now will give each image a 2nd look at a 1:1 pixel peview so that I can evaluate actual image quality (focus, depth of field, etc).
- Images that are unique with no similar images, I will just ensure that they are of acceptable quality to keep. If they are not acceptable I click the reject flag (or select “x” on the keyboard). This “rejects” the image and since the filter is still active, that image will disappear from view.
- Images that are similiar in subject and composition I will cull using the “survey view” screen (look at bottom left. It is a button with three squares in it). This will display all images you’ve selected. So select the similar images and press “survey”. You can then compare the composition of all these images at once. You want to look for images that you do NOT want. ie; reject them. So using the reject flag (small bottom left of each image) get ride of each image that doesn’t make the cut. Eventually you’ll have only two or three images left. Take the remaining images into the “Split screen” to compare image quality.
- Using the “split screen” view I can compare both images side by side and zoom 1:1 preview on them simultaneously allowing me to determine which one has the best focus and depth of field. Again you use the “reject” flag to pick the images you do NOT want.
- Note that your filter used above should still be turned on…. this causes any image that gets rejected to disappear.
Step 3: I’m going to work this one! – In this last step you determine which images are going to be processed for display.
- Back to the beginning once again and now I am looking for only those images which are so good that I’m going to either print them, use in my portfolio, or put up For Sale in my Photography Store. (For those taking pictures for fun, these would be the images you are going to put into your Facebook or Flicker albums to share).
- These are the images you are actually going to process in the “Develop” module. There is no need to waste time developing all your images you keep. Only the ones that are going “out to the world” need to go through this process.
- In this final step, I will use a color key (I personally use “9” for “blue” and “8” for “green”) to clearly mark my best images which I’ll then develop fully. I consider blue to be my portfolio worthy images and green as those good enought to share with the world (just not my best work).
Final Cleanup – I usually wait a week or two before I do this next step just in case I want to revisit a rejected photo. When you are finally ready to remove rejected photographs from your library (and hard drive) you need only go to Photo>Delete Rejected Photos (ctrl + backspace). This will delete all rejected photos (from any and all sorting you’ve done since the last “delete rejected” was run). Note it will only delete rejected photos from whichever folder you have selected in your Folders dialog.
So hopefully you see the benefits of this method:
- It allows you to view an image several times before passing full judgment, often your impression of an image will change after you have viewed and thought about all the images in the set.
- It allows you very quickly remove the obvious junk.
- It leaves you with a clear and decisive list of those images which need to move on to the developing stage.
- It’s completely keyboard driven, so it’s fast.
- Has stages, which allow you to stop and come back later (in times of very large imports or your time is short) without loosing your objectivity.
- Most Importantly! It provides a structured way to sort images so that you are applying the same thought process to every new import batch. Looking at each image once and making a decision leaves too much room for changes in method based on your mood, if you’re in a hurry, etc etc.
If you have your own culling method which works well. I’d like to hear about it. Maybe I can improve on this method.